How to tempt a puppy step by step. They are our best friends, as they say. But puppies can be extremely challenging to draw unless you know a few simple tricks.
Possibly you would enjoy trying your writing at a portrait of your puppy or are interested in animal illustrations. Either way, the best way to start drawing a puppy is to know how to draw one from the imagination.
That’s why we show you in our eight-step tutorial how to put together a lifelike puppy that’s completely out of the mind’s eye. It might sound intimidating, but like most designs, you’ll be amazed at how quickly you can get impressive results if you break the process down into a series of streamlined steps.
Read on for our step-by-step guide on drawing a puppy from imagination.
What materials do I need?
You can bring your puppy to live with anything from pastels to watercolors, but in this guide, we’ll keep it nice and simple:
All you require are the ensuing textiles:
- A sheet of plain A4 paper
- Two pencils: 2B, HB, or both are fine.
- A pencil sharpener: You will need a sharpened pencil for details at the end of this drawing.
- An eraser can come in handy if you want to erase some of the guides in this drawing partially, but it’s not essential.
Check out our guide to the best pencil drawings for some recommended materials.
How to tempt a puppy step by step
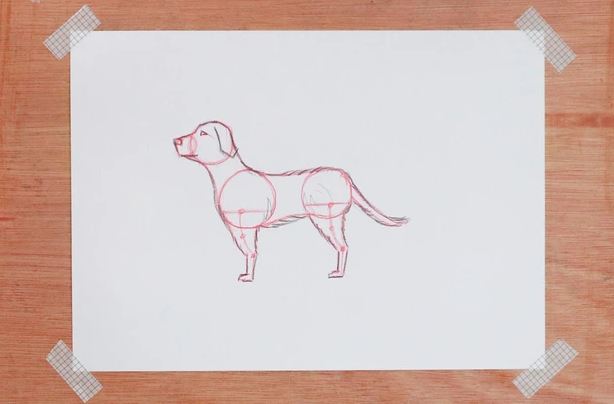
The trick to drawing a puppy is to focus on the general anatomy shape rather than bringing it bogged down in pieces like eyes, paws, and fur.
There is, of course, no generic type of dog. They arrive in all figures and dimensions – after all, you will never confuse a Labrador drawing with a Chihuahua drawing.
But here’s the problem with puppies: they all remain very similar four-legged mammals for all their breed differences. Every puppy has the same number of essential limbs, joints, and muscles – and these are the things we will keep in mind in this demonstration.
Don’t worry, and we don’t expect you to have a veterinary degree to follow this tutorial. Like drawing human figures, assembling the dog shape from a set of basic geometric shapes is quite easy. And once you’ve mastered this basic puppy side profile, you’ll find it’s easy to apply to all kinds of other poses and positions.
So let’s get started. In this example, we don’t want to draw a specific dog’s breed – let’s see what comes out of it!
You will need
- paper
- Pencils (1 or 2), HB, and 2B
- pencil sharpener
- Eraser or putty rubber
Total time:
1 hour
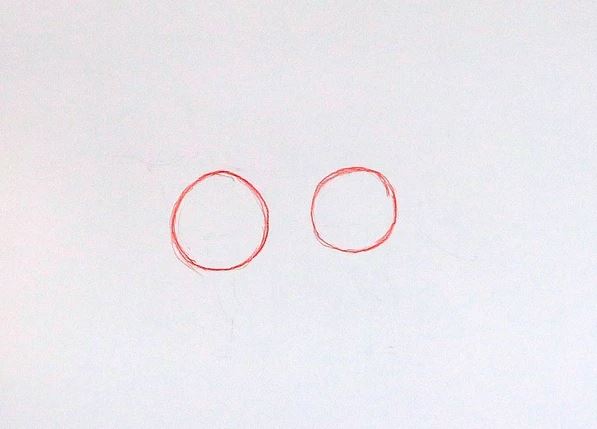
Step 1
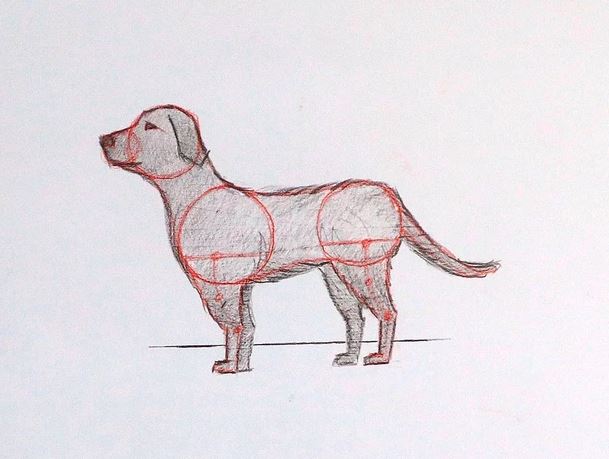
Let’s start with two circles, the left one slightly larger than the right one, with a small gap between them. You don’t have to be perfectly circular – don’t slow down at this stage by being a perfectionist. These form the main body of the puppy.
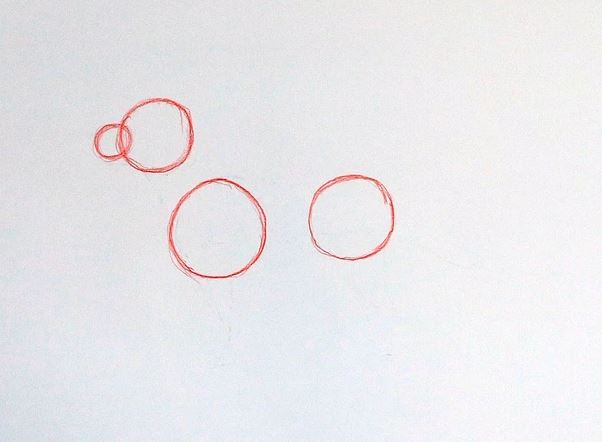
Step 2
Now let’s draw a smaller circle over them that intersects with an even smaller process. These form the base of the puppy skull and muzzle. Do not worry; Your puppy won’t have a cartoonish muzzle like Goofy – this is a simple rough guide.
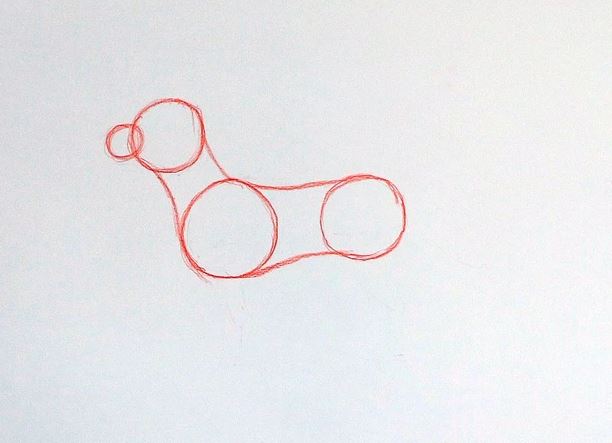
Step 3
Connect the three largest circles with a series of lines. Try thinning them instead of being perfectly straight – you’re not drawing a robot dog. See how you can already see what the dog looks like in just three steps?
Step 4
This is where it begins to gain a little more difficulty. It measures about a third on both circles of the body – this is where the puppy legs connect to his body.
Interestingly, a puppy leg has the same number of joints as a human leg, only with different ratios. Compared to humans, a do puppy has huge paws and toes.
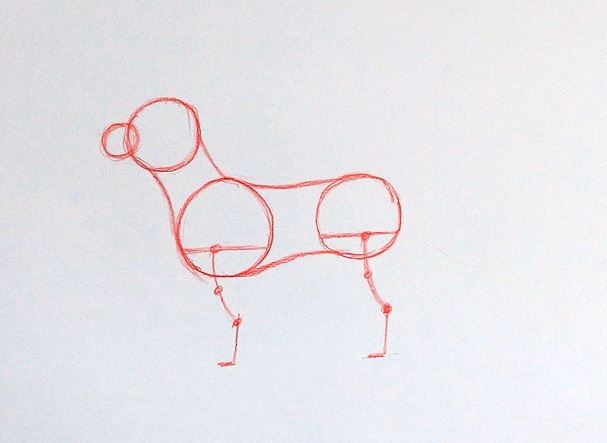
An easy way to draw a puppy’s paw in shorthand is to remove some flattened crescent and add four points along the way.
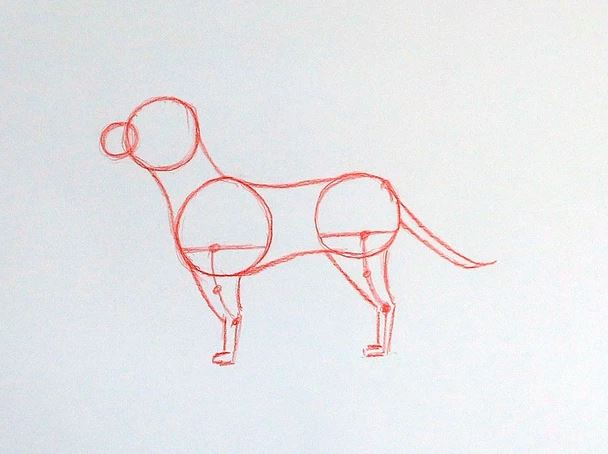
Step 5
Now our puppy is taking shape. Add curved lines, almost like breeches, for the top of the puppy paws. The lower legs are lean. Draw small boxes for the legs.
Add a tail, and don’t worry if it looks a bit wormy at that point. The fun thing about drawing a puppy is how many characters you can convey with its tail: when it is erect, your puppy is excited and happy; If he’s down, your puppy is nervous or insecure.
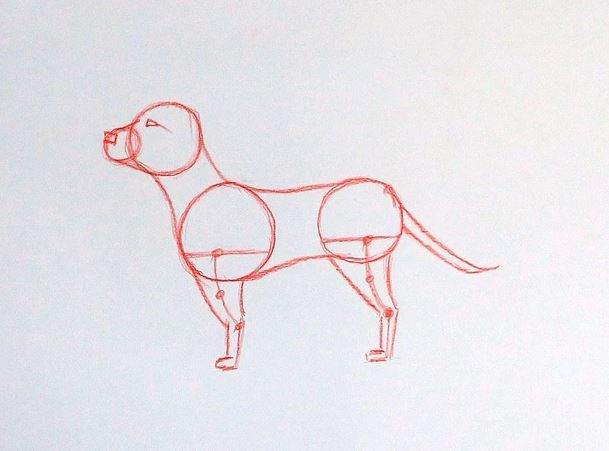
Step 6
The head is where puppies start to differentiate – think, for example, of how a dachshund’s muzzle is compared to a pug’s muzzle. In this demonstration, we will keep the details clear. Let’s add a simple triangle for the eye and a box for the nose.
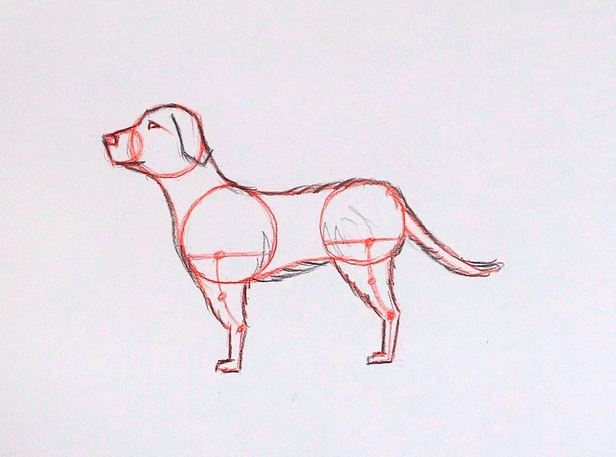
Step 7
Now let’s turn these geometric shapes into a real creature using a darker pencil. The key is to use fine lines around the puppy outline to indicate his coat. Change the length of the lines depending on the size of the hair.
Add the ears (hanging here) to the back of the puppy skull. You can use straighter lines for the muzzle outline, where there is little flesh.
Step 8
Since we’ve come this far, let’s bring our puppy creation to life. A shading point gives this puppy a little more substance on the paper, and we added the other two paws that we darkened to suggest some depth.
A baseline horizontal line is an easy way to give your dog a little context. Why not complete your design with extra details, perhaps a bowl or a dog toy?
There you have finished how to draw a puppy step by step. We hope you found it useful! If you enjoy creating your illustration talents further.
Also read: Let’s Start a Tech Business On Our Own